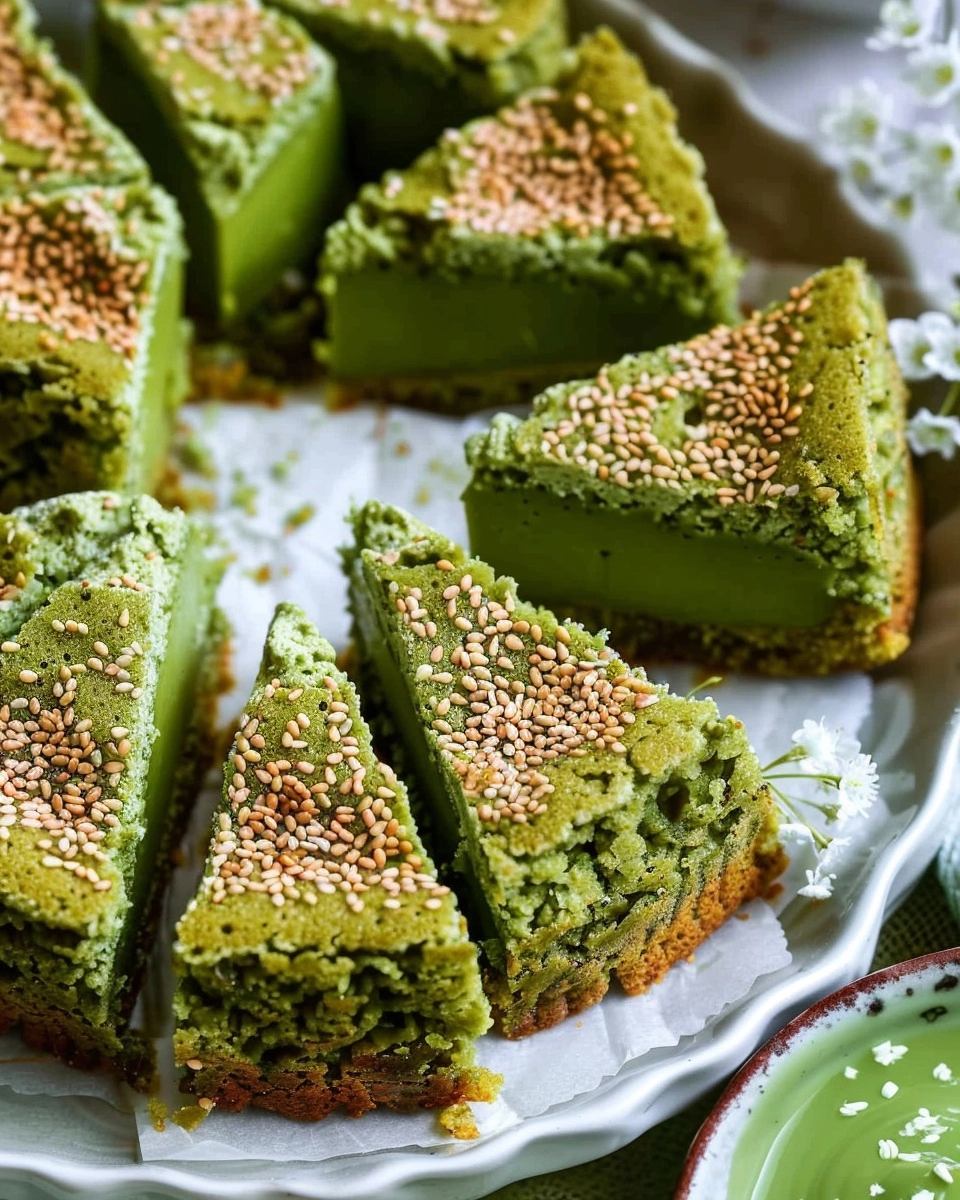
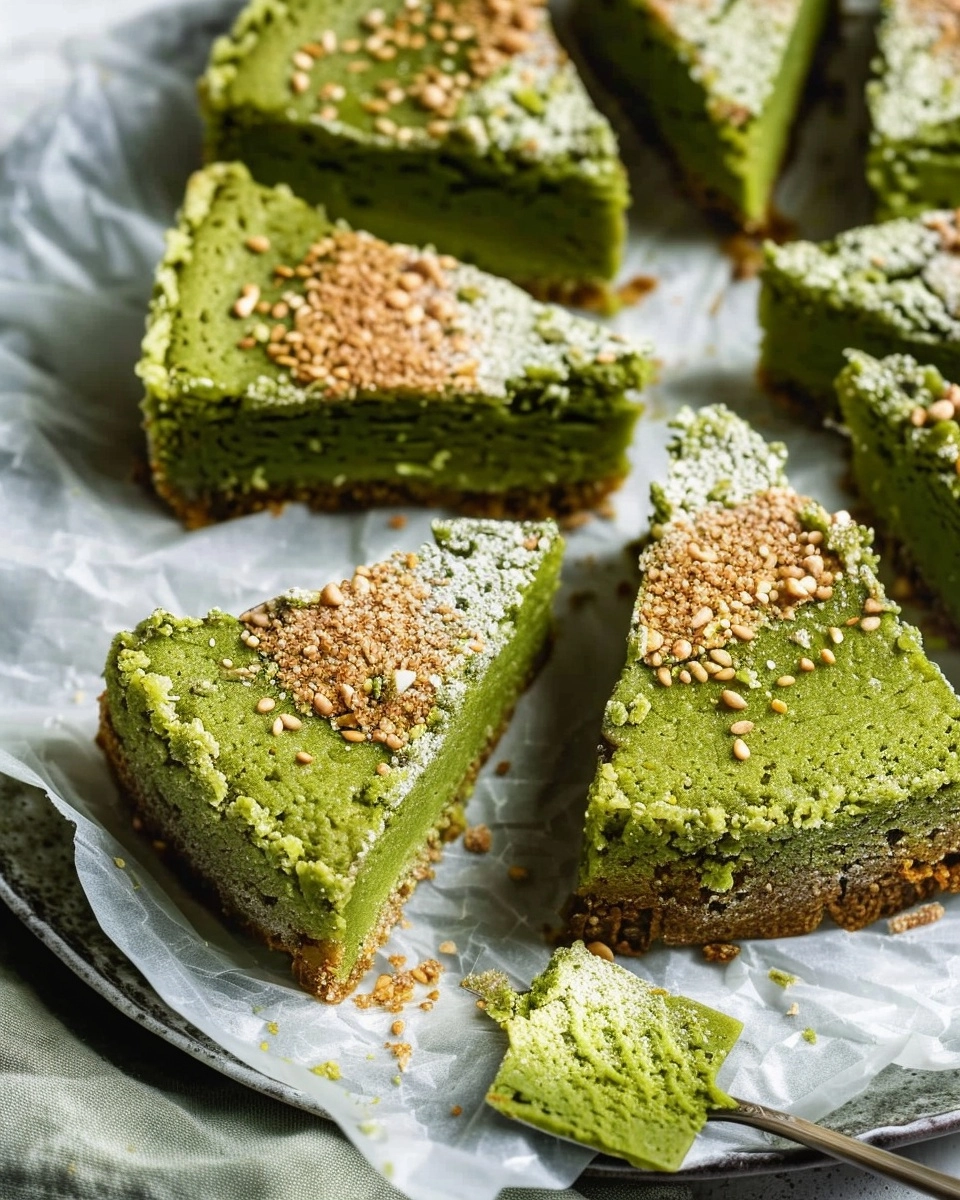
Fancy a treat that’s chewy, buttery, and delightfully infused with the bright, earthy flavor of green tea? This Matcha Mochi Cake beautifully marries the crave-worthy texture of Hawaiian butter mochi with the unmistakable taste (and color!) of matcha, finishing off with a toasted coconut crown that’s simply irresistible. Making a batch is blissfully easy, and every bite is a little celebration: crisp on top, tender and sticky within. Whether you’re a seasoned matcha lover or just looking for a playful dessert to try at home, Matcha Mochi Cake is about to be your new favorite.
Ingredients You’ll Need
The magic of Matcha Mochi Cake starts with a handful of staples you probably already have, plus a few essentials that make this cake uniquely chewy and delicious. Each ingredient plays a crucial part in developing that unforgettable flavor, aroma, and texture. Here’s what you’ll need and why:
- 4 large eggs: Provides richness and structure for that wonderful, custardy interior.
- 2 tsp pure vanilla extract: Adds a dreamy layer of warmth and enhances the cake’s sweetness.
- 2 cups whole milk: Brings moisture and helps create the soft, bouncy crumb.
- 2 cups granulated sugar: Balances the subtle bitterness of matcha with gentle sweetness.
- 1½ tbsp matcha powder (sifted): For vibrant color and signature earthy flavor; sift for the smoothest results.
- 1 (1 lb) box sweet rice flour (mochiko): The must-have for mochi’s signature stretchy, chewy texture.
- 2 tsp baking powder: Gives a lovely lift, keeping the cake from becoming too dense.
- ½ tsp kosher salt: Just a pinch to sharpen flavors and balance sweetness.
- ½ cup unsalted butter, melted (plus 1 tbsp for greasing): Infuses the cake with buttery richness and keeps it moist.
- 1 (13.5 oz) can full-fat coconut milk: Lends creaminess and a subtle tropical undertone.
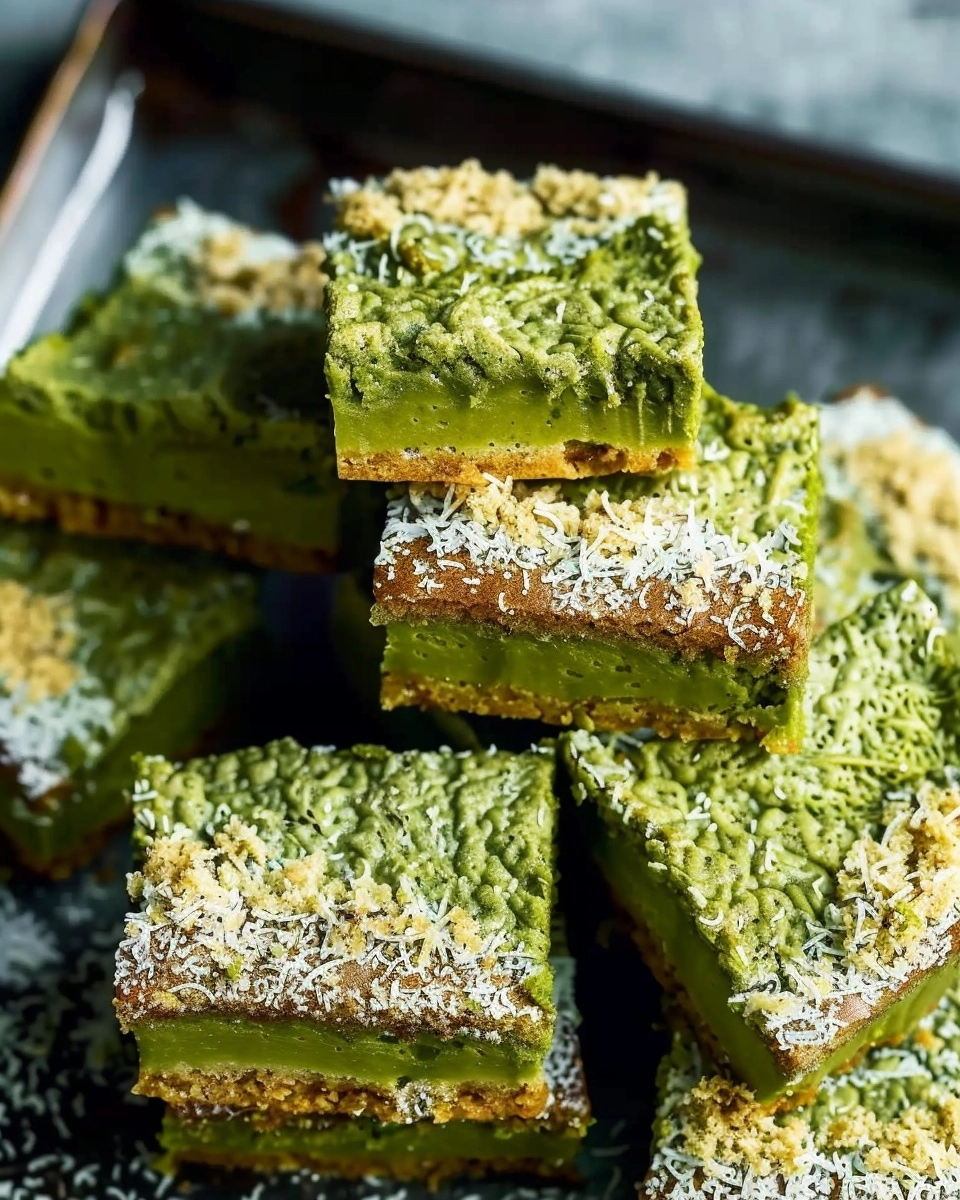
- ½ cup unsweetened shredded coconut: Toasts beautifully on top for extra flavor and a delicate crunch.
- Pinch of flaky salt (optional, for topping): The finishing touch, if you like a salty-sweet contrast.
How to Make Matcha Mochi Cake
Step 1: Prep Your Pan and Oven
Begin by setting yourself up for success: preheat your oven to 350°F (175°C) so it’s ready to go by the time your batter comes together. Grease a 9×13-inch baking pan generously with 1 tablespoon of melted butter. This slick coating guarantees a beautifully golden crust and effortless removal once your Matcha Mochi Cake is baked.
Step 2: Whisk the Wet Ingredients
In a medium bowl, whisk together the eggs, vanilla extract, and whole milk until glossy and well blended. This smooth mixture is what will give your cake a custard-like tenderness later on, so don’t be shy—whisk until you see no streaks of egg or uneven color.
Step 3: Stir Up the Dry Base
Grab your largest mixing bowl and combine the granulated sugar and sifted matcha powder. Whisk these together thoroughly to ensure the matcha is evenly distributed and there aren’t any powdery clumps. Next, add the sweet rice flour, baking powder, and kosher salt, whisking again to achieve cohesion between the ingredients. This dry mix is the backbone of classic Matcha Mochi Cake texture.
Step 4: Create the Batter
Pour your egg mixture into the dry ingredients and stir together until everything just comes together. Switch to a spatula or keep whisking gently until the batter looks smooth and free of lumps—an even, brilliant green is your cue that you did it right!
Step 5: Add the Buttery Coconut Magic
Mix in the melted butter and coconut milk, blending until the entire batter is gorgeously creamy and consistent. This is when you’ll notice the scent of coconut and matcha begin mingling—so tempting! Resist the urge to overmix here; just enough to combine is perfect.
Step 6: Assemble and Top
Pour the luscious batter into your prepared pan and tap it gently on the counter to release any sneaky air bubbles hiding inside. Evenly sprinkle the shredded coconut over the top for that signature toasted finish. If you’re a salty-sweet fan, add a pinch of flaky salt on top now.
Step 7: Bake to Perfection
Slide your pan into the oven and bake for about 1 hour, or until the top is softly golden and set. Your kitchen will fill with a captivating aroma that’s half-bakery, half-café. If you’re unsure, a gentle tap on the surface should feel firm—don’t be tempted to underbake, as a gooey center is less fun here. Remove from the oven and let it cool completely in the pan before slicing into cute, grabbable bars.
How to Serve Matcha Mochi Cake
Garnishes
Let your creative side shine! A simple dusting of extra matcha powder across the bars gives a striking color contrast and a little flavor boost. Try a drizzle of sweetened condensed milk for a luscious, creamy touch, or add a scattering of sliced strawberries for a lively pop. A few extra flakes of toasted coconut never hurt, either!
Side Dishes
Matcha Mochi Cake is lovely alongside fresh fruit—think juicy mango, tangy pineapple, or ripe berries to add brightness. For a cozy pairing, serve with a scoop of vanilla ice cream. If you’re enjoying these at tea time, nothing enhances the flavor like a cup of hot green tea, jasmine tea, or even a creamy latte.
Creative Ways to Present
Transform your Matcha Mochi Cake into eye-catching bites by using a cookie cutter to press out fun shapes, perfect for special occasions or lunchbox treats. For parties, serve squares on decorative toothpicks, or stack them in layers with whipped cream for a playful dessert tower. You can also wrap individual bars in parchment for adorable edible gifts!
Make Ahead and Storage
Storing Leftovers
Once your Matcha Mochi Cake has cooled, transfer the bars to an airtight container. They’ll stay fresh and delightfully chewy at room temperature for about 2 days, or up to 5 days in the refrigerator. Just make sure the container is sealed well to prevent them from drying out.
Freezing
Want to save some for later? You absolutely can freeze Matcha Mochi Cake! Wrap individual pieces tightly in plastic wrap, then place them in a freezer-safe zip bag or container. They’ll keep their signature chew for up to 2 months. When you’re ready to indulge, just thaw overnight in the fridge.
Reheating
If you love a warm treat, pop a bar of Matcha Mochi Cake in the microwave for 10–15 seconds, just until slightly warmed through and soft. Avoid over-microwaving, which can toughen the mochi; a little warmth brings back that bakery-fresh texture.
FAQs
Can I use a different type of flour instead of mochiko?
For authentic texture, only sweet rice flour (mochiko) will do; regular rice flour or all-purpose flour won’t give you the characteristic chewiness that’s essential to Matcha Mochi Cake.
How do I prevent lumps of matcha in the batter?
The key is to sift your matcha powder before adding it to the sugar, then whisk thoroughly. This extra step makes a huge difference in achieving a smooth, even green color throughout your cake.
Can I reduce the sugar for a less sweet version?
Yes! If you prefer a more subtly sweet cake, feel free to cut the sugar to 1½ cups. This adjustment won’t impact the structure and will let the matcha flavor shine through a bit more.
Is it normal for the cake to be slightly sticky in the center?
Absolutely! Matcha Mochi Cake is meant to have a chewy, sticky bite in the middle; the top should be set but the interior will remain soft and mochi-like after baking.
Can I double the recipe for a crowd?
You can double everything and bake the cake in two pans, or use a large sheet pan with higher sides if you have one. Just watch the baking time—the cake should still be set and lightly golden on top.
Final Thoughts
If you’re on the fence about baking Matcha Mochi Cake, let this be your sign to go for it! It’s fun to make, a joy to share, and might just become your new standby for every celebration (or simple afternoon pick-me-up). Gather your ingredients, share with friends, and discover that magical combination of chewy, sweet, and a touch earthy that only this cake can deliver.
Print
Matcha Mochi Cake Recipe
- Total Time: 1 hour 5 minutes
- Yield: 20–24 bars 1x
- Diet: Gluten Free
Description
This chewy Matcha Mochi Cake offers an irresistible fusion of earthy matcha green tea and Hawaiian butter mochi, all wrapped in a gooey, soft texture. Topped with toasted coconut, it delivers a delightful contrast of flavor and a subtle crunch, making each bite uniquely satisfying and perfect for dessert, snacking, or sharing at gatherings.
Ingredients
Wet Ingredients
- 4 large eggs
- 2 tsp pure vanilla extract
- 2 cups whole milk
- ½ cup unsalted butter, melted (plus 1 tbsp for greasing)
- 1 (13.5 oz) can full-fat coconut milk
Dry Ingredients
- 2 cups granulated sugar
- 1½ tbsp matcha powder, sifted
- 1 (1 lb) box sweet rice flour (mochiko)
- 2 tsp baking powder
- ½ tsp kosher salt
Topping
- ½ cup unsweetened shredded coconut
- Pinch of flaky salt (optional, for topping)
Instructions
- Prepare the Pan: Preheat your oven to 350°F (175°C). Grease a 9×13-inch baking pan with 1 tablespoon melted butter, ensuring all corners are coated to prevent sticking.
- Mix Wet Ingredients: In a medium bowl, whisk together the eggs, vanilla extract, and milk until the mixture is smooth and well-blended.
- Prepare Sugar and Matcha: In a large mixing bowl, combine the granulated sugar and sifted matcha powder. Whisk thoroughly to eliminate any lumps, ensuring an even distribution of tea flavor.
- Add Dry Ingredients: To the sugar and matcha mixture, add the sweet rice flour, baking powder, and kosher salt. Whisk again just until combined, forming a pale green, powdery mix.
- Combine Wet and Dry Mixtures: Pour the egg mixture into the bowl with the dry ingredients. Stir with a spatula or whisk until no streaks remain and the batter is smooth.
- Add Butter and Coconut Milk: Mix in the melted butter and full-fat coconut milk, stirring until the batter is fully incorporated, glossy, and free of lumps.
- Fill the Pan: Pour the batter into the prepared baking pan. Tap the pan gently on the counter a few times to release any trapped air bubbles.
- Add Toppings: Evenly sprinkle the shredded coconut and a pinch of flaky salt (if using) over the top of the batter.
- Bake: Place the pan in the oven and bake for 1 hour, or until the top is set, lightly golden, and a toothpick inserted comes out mostly clean.
- Cool and Slice: Remove the cake from the oven and allow it to cool completely in the pan. Once cooled, slice into bars and serve.
Notes
- For the best texture, use mochiko sweet rice flour, not regular rice flour.
- The cake is naturally gluten-free due to the sweet rice flour.
- Store leftovers in an airtight container at room temperature for up to 2 days or refrigerate for up to a week.
- You can lightly toast the coconut topping under the broiler for extra crunch and color, but watch closely to avoid burning.
- Customize by adding white chocolate chips or chopped nuts before baking for additional texture and flavor.
- Prep Time: 5 minutes
- Cook Time: 1 hour
- Category: Desserts
- Method: Baking
- Cuisine: Hawaiian-Japanese Fusion
Nutrition
- Serving Size: 1 bar (approx. 1/24 cake)
- Calories: 180
- Sugar: 13g
- Sodium: 81mg
- Fat: 7g
- Saturated Fat: 5g
- Unsaturated Fat: 2g
- Trans Fat: 0g
- Carbohydrates: 27g
- Fiber: 0.6g
- Protein: 2g
- Cholesterol: 28mg