
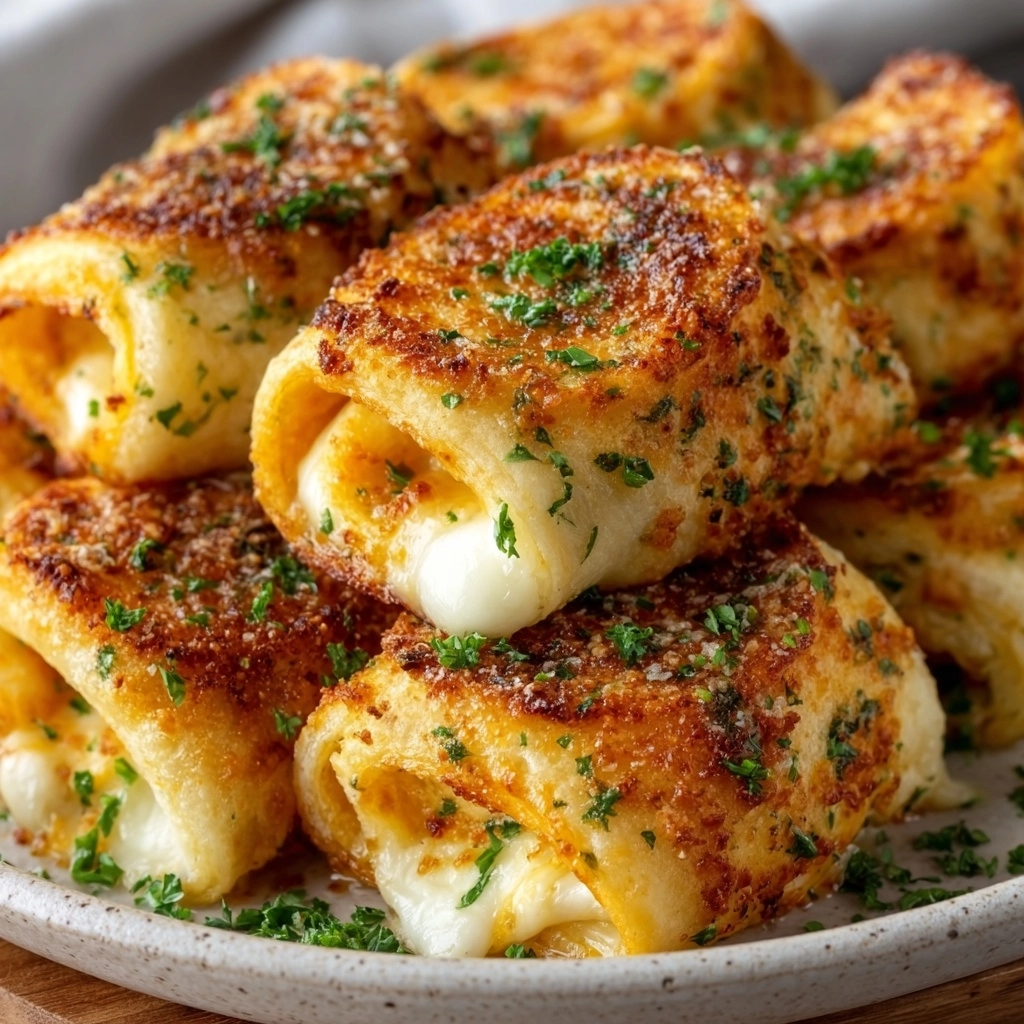
Golden, buttery, and oozing with melty cheese—these cheesy garlic butter roll-ups are the perfect pull-apart snack, appetizer, or side for any meal.
What You’ll Need
The magic of Cheesy Garlic Butter Roll‑Ups is how such a short list of simple ingredients comes together for knockout flavor. Each piece brings something essential — whether it’s the creamy cheese, aromatic herbs, or the buttery biscuits you just want to pull apart while they’re still warm.
- Refrigerated biscuit dough: The ultimate shortcut for flaky, pillowy soft rolls with zero fuss.
- Unsalted butter, melted: The backbone of that gorgeously rich garlic butter soak; don’t skimp.
- Fresh garlic, minced: Nothing beats real garlic for depth and aroma — it infuses every bite.
- Dried parsley: Pops of green and a subtle, fresh flavor to balance the richness.
- Italian seasoning: A little bit of everything that makes the rolls taste like homey comfort food.
- Mozzarella cheese, shredded: Provides that ooey-gooey melt and signature cheese pull.
- Parmesan cheese, grated: Savory, salty, and nutty — just a dusting makes all the difference.
- Salt and pepper, to taste: Simple, essential, and customizable to just the way you like it.
How to Make Cheesy Garlic Butter Roll‑Ups
Step 1: Prep Your Oven and Pan
Start by preheating your oven to 375°F (190°C). This step makes sure you get those lovely golden tops and melted centers. Give a 9”×5” loaf pan or similar oven-safe dish a quick coat of nonstick spray — nothing ruins the magic like stuck-on cheese!
Step 2: Make the Garlic Butter
Melt the butter and stir in your minced garlic, dried parsley, Italian seasoning, a pinch of salt, and a little pepper. This buttery blend is going to soak into the rolls, flavoring them to their core and giving the house that irresistible fresh-bread aroma as they bake.
Step 3: Flatten and Fill the Biscuits
Pop open your biscuit dough and separate it into eight rounds. Press each one into a flat 4-inch circle with your fingers — don’t worry about perfection! Now pile about a tablespoon of mozzarella and a teaspoon of Parmesan in the center of each flattened biscuit. This is where the magic begins for your Cheesy Garlic Butter Roll‑Ups.
Step 4: Roll Them Up
Take those stuffed biscuits and roll them up tightly like little logs, making sure to tuck in the cheese and pinch the ends to seal. You want every bit of that cheesy goodness to stay inside and melt perfectly as they bake.
Step 5: Arrange and Brush
Line up the roll-ups seam side down in your greased pan, snuggly fitted together. Brush the tops with half of your garlic butter mixture — it’s going to seep in as they bake, ensuring every bite is loaded with flavor.
Step 6: Bake Until Perfect
Bake the Cheesy Garlic Butter Roll‑Ups for 15–18 minutes. You’ll know they’re ready when the tops are puffed, golden, and the cheese is bubbling away. Try not to open the oven too soon — that tantalizing smell will make patience the hardest part!
Step 7: Finish with More Garlic Butter
Once out of the oven, brush the warm roll‑ups with the rest of your garlic butter for vibrant shine and even more flavor. Let them cool for just a few minutes (if you can wait!), then dig in while the cheese is still melty.
How to Serve Cheesy Garlic Butter Roll‑Ups

Garnishes
A sprinkle of extra Parmesan and a little more chopped fresh parsley right before serving elevates both the flavor and look of your Cheesy Garlic Butter Roll‑Ups. That little pop of green and dusting of cheese says, “these are something special!”
Side Dishes
These roll‑ups play wonderfully with all kinds of accompaniments. Try them next to a bowl of marinara for dipping, a simple green salad for freshness, or alongside your favorite soup for the ultimate cozy meal. Honestly, they can stand alone as a snack, but they’re also great as a side at family dinners.
Creative Ways to Present
If you’re serving guests, arrange your Cheesy Garlic Butter Roll‑Ups in a bread basket lined with a linen napkin for that “straight from the bakery” vibe. Or, pull them apart for a fun, sharable appetizer on a wooden board surrounded by dipping sauces. They’re also adorable served in cupcake wrappers at parties — watch them get scooped up instantly!
Make Ahead and Storage
Storing Leftovers
If you manage to have any leftovers, store the Cheesy Garlic Butter Roll‑Ups in an airtight container in the fridge. They’ll stay fresh and flavorful for up to 3 days — just try not to snack on them every time you open the fridge!
Freezing
Want to make a batch ahead? Bake and cool the roll‑ups completely, then wrap them individually in plastic wrap and freeze in a zip-top bag. They’ll keep well for up to a month, making them a great make-ahead treat for impromptu cravings or quick lunches.
Reheating
For the best texture, warm thawed Cheesy Garlic Butter Roll‑Ups in a 325°F (163°C) oven for 10 minutes or until heated through. You can also microwave them for 20–30 seconds if you’re in a hurry, though the oven gets you that perfect crispness again.
FAQs
Can I use other types of cheese?
Absolutely! Cheddar, provolone, or pepper jack would all be delicious, either on their own or mixed in with the mozzarella. Have fun customizing the filling to match your favorite flavors!
What if I don’t have biscuit dough?
You can substitute with pizza dough or crescent roll dough for a slightly different texture. Just roll them out and fill as directed — no need to change anything else.
Are Cheesy Garlic Butter Roll‑Ups vegetarian?
Yes! All the ingredients are vegetarian-friendly. Just be sure to check your cheese labels if you’re serving strict vegetarians, as some cheeses use animal-based rennet.
Can I prep these in advance for a party?
Definitely. Prep the roll-ups through step five, cover the pan with plastic wrap, and refrigerate for up to eight hours before baking. When you’re ready, just bake as instructed for warm, cheesy, freshly baked bites.
Can the recipe be doubled for a crowd?
No problem at all! Just use a larger baking dish and double all ingredients. Keep an eye on baking time — they may need a few extra minutes if your pan is large or packed full.
Final Thoughts
These Cheesy Garlic Butter Roll‑Ups truly hit every comfort food craving, and they’re just as fun to make as they are to eat. Whether you whip them up for a special gathering or treat yourself on a quiet night in, their gooey, garlicky goodness is always a hit. I hope you give this recipe a try soon — your family and friends will thank you (and probably ask for the recipe)!
Love This Recipe? Here Are More Cheesy & Comforting Favorites
If you’re craving more savory, buttery goodness, don’t miss our viral Cheesy Garlic Toast Pizzas or the ultra-fluffy Air Fryer Cheesy Garlic Tortilla Bread. Amp up the cozy vibes with our hearty One-Pot Cheesy Stuffed Pepper Casserole or snack on these crowd-pleasing Cheesy Sausage Egg Muffins. And for the ultimate pull-apart magic, our Cheesy Garlic Pull-Apart Muffin Cups will steal the show.
Print
Cheesy Garlic Butter Roll‑Ups Recipe
- Total Time: 28 minutes
- Yield: 8 roll-ups 1x
- Diet: Vegetarian
Description
Golden, gooey, and drenched in garlic butter, these Cheesy Garlic Butter Roll-Ups are an irresistible snack or side that’s ready in minutes.
Ingredients
Biscuit Dough
- 1 can refrigerated biscuit dough (8 count)
Garlic Butter
- 4 tablespoons unsalted butter, melted
- 2 cloves garlic, minced
- 1 teaspoon dried parsley
- 1/2 teaspoon Italian seasoning
- Salt and pepper to taste
Cheese Filling
- 1 cup mozzarella cheese, shredded
- 1/4 cup Parmesan cheese, grated
Instructions
- Prep the Oven and Pan: Preheat your oven to 375°F (190°C). Lightly grease a 9″×5″ loaf pan or any oven-safe dish to prevent sticking.
- Make Garlic Butter: In a small bowl, combine the melted butter, minced garlic, dried parsley, Italian seasoning, salt, and pepper. Mix well and set aside.
- Prepare Biscuits: Separate the biscuit dough and flatten each biscuit with your hands or a rolling pin to about a 4-inch circle.
- Add Cheese Filling: Sprinkle about 1 tablespoon of shredded mozzarella and 1 teaspoon of grated Parmesan onto the center of each flattened biscuit.
- Roll Up and Arrange: Roll up each biscuit tightly, encasing the cheese inside. Pinch the seams to seal and place seam-side down in the prepared baking pan, arranging them snuggly together.
- Brush with Garlic Butter: Generously brush the tops of the roll-ups with half of the garlic butter mixture to infuse them with flavor and help them brown.
- Bake: Bake in the preheated oven for 15–18 minutes, or until the tops are golden brown and the cheese has melted inside.
- Finish and Serve: Remove from the oven and immediately brush the tops again with the remaining garlic butter. Allow to cool for a few minutes before serving warm.
Notes
- For extra flavor, add a pinch of crushed red pepper flakes to the garlic butter.
- Switch up the cheese—try provolone or cheddar for a tasty twist.
- Serve with warm marinara sauce or ranch for dipping.
- Leftovers can be stored in an airtight container and reheated in the oven for best texture.
- To make ahead, assemble roll-ups and refrigerate; bake just before serving.
- Prep Time: 10 minutes
- Cook Time: 18 minutes
- Category: Snacks
- Method: Baking
- Cuisine: American
Nutrition
- Serving Size: 1 roll-up
- Calories: 200
- Sugar: 2g
- Sodium: 430mg
- Fat: 12g
- Saturated Fat: 6g
- Unsaturated Fat: 5g
- Trans Fat: 0g
- Carbohydrates: 18g
- Fiber: 1g
- Protein: 6g
- Cholesterol: 25mg